Introduction:
As a photographer using a digital camera, you must select a file format to record and store images, JPEG and RAW on your card in your camera. It is always best to first format this storage disk in camera and never format it on your computer. So which one should you use to get the best quality image?
Masters-Tip: For professional work, always shoot and store your images using the best quality settings that you have.
RAW Format:
A digital RAW files contains all of the unprocessed information captured by the sensor of your digital camera at the time of exposure. No photograph is contained. When you view this file, the software will show you a JPEG of your RAW information. Camera settings for color space, sharpness, saturation and white balance are not in the RAW file, they are tags that accompany the RAW file through out the conversion process.
One of the chief problems with digital cameras is that each manufacturer has its own RAW Format: Nikon-NEF, Canon-.crw, Olympus -.orf, etc. Adobe tried to set up a standard digital negative called DNG, and a few manufactures are using this format.
There are many programs out there for you to use to convert your camera images. Normally each manufacturer gives you a copy of their program with your camera. Some of these programs are: Adobe Camera RAW, DXO, Phase One, etc.
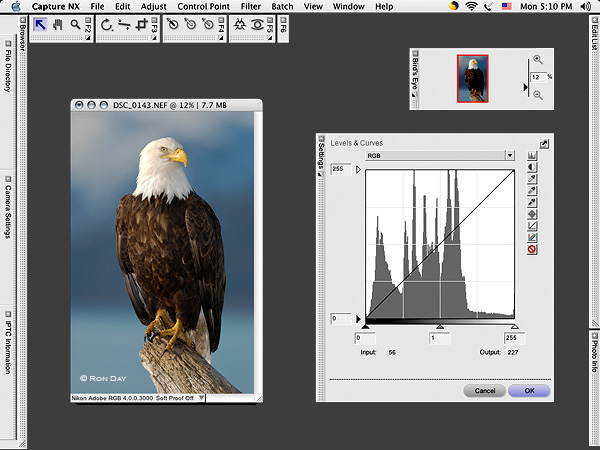
Here is an example using Nikon Capture NX in Figure 1.
Figure 1
The Advantage of Using RAW.
1. No LOST DATA. JPEG files were never meant to be used for storing pictures. Their advantage is the small file sizes. This comes at a price of loosing input information during compression. This type of file can be compressed as much as a 1:10 ratio. If it is opened and saved often, it starts to show degradation in quality.
2. The RAW file on the other hand DOES NOT LOSE DATA. All changes to this file are stored on an attached file. Many photographers store information on TIFF and or PSD format known as "Loss-less" because they preserve image quality and lose no data, regardless of the number of times they are opened.
3. JPEGS may be produced in Camera or post production by you RAW processor. During processing, your camera or RAW processor applies a tone curve to the data in an attempt to create an image with acceptable brightness and contrast levels. With some RAW converters like DXO, you can apply the tone curve of any camera that you like too. A lot of the original information is thus lost for ever.
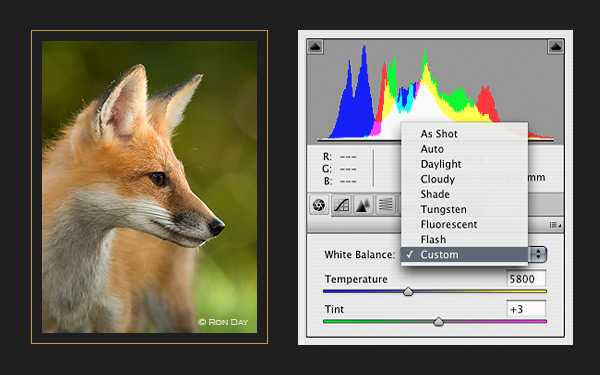
3. White Balance- Please refer to our post on White Balance. The color temperature and often the mood of an image is controlled by the White Balance. If set incorrectly, the skin tones will not show properly. I will be posting a lesson on how to correct skin tones in the future. One of the great tools in RAW processing is the White Balance dropper, with one click the image White Balance can be set. You can do this with a grey object or something white that has the same RGB numbers (Red-Green-Blue).
4. BIT DEPTH. The quality of a digital image may be related to its bit depth. Bit depths of 12,14, and 16 are all good to use. Try to process at the highest number you can, like 16 bits. I could not see any difference between 12 and 16 bits from the camera, but the curves will be smoother and thus limiting posterization. Also some plugin can correct this. All printers and JPEGS are 8 bit files or contain 256 tonal values in each of the 3 color channels (Red, Blue, Green) for a total of 16.7 million possible colors per pixel. A 12 bit RAW file has 4,096 per channel for a total of 68.7 billion colors per pixel and so on. There is a huge difference between 8 bit and 12 bits. I always use Photoshop in 16 bit mode except with HDR images which I recall are 32 bits.
Figure 3. Posterization
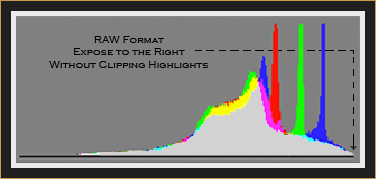
5. Exposing to the Right. All photographers must be concerned about loosing information by over exposing their camera's sensor. This is referred to a blowing the highlights and modern camera have a built in warning system referred to as the "blinkies" as the camera screen when set up for this alert, will flash. Using Canon Camera produce the best results when exposed just into the last column on the right and NOT all the way to the right. DXO even recommends that if you underexpose by -1EV that you can recover two stops with their software. As I have said before, the information is normally there, it is just what software program you use to process it. If however, you blow out the information by exceeding the 256 tones of a pixel, you can never recover it. Most camera have a built in safety margin that will allow some recover in post processing but if you blow out the information, it will be gone. You want to maximize the signal to noise ratio of your image at all times without losing information.
Masters-Tip: Setup your camera to show the "blinkies" and "chip" (that is check your view screen after taking the shot) your images when ever you change exposure scenes. This is referred to as the highlight alert.
Figure 4. RGB Histogram
|
Masters-Tip: Not all Histograms are like the above image. A perfectly exposed image may have very little information on the right side of the Histogram. I will put up a post on this this month.
Note: With Canon camera's it is best to expose to the start of the 5th quadrant or a little less than shown above.
Discussion:
When trying to decide which to use, JPEG or RAW, I ask myself what am I going to do with the images? How important are they? Will I get a second chance to shot them? As a wedding photographer the answer to me and many others is shoot RAW. For other pictures JPEGs maybe just fine. If I may want to work on a sunset or other landscape picture, I shoot RAW. There are many RAW converters to use. I use DXO and Adobe Camera RAW. Canon also supplies a RAW converter with their Cameras as do other manufactures. If I have the RAW file stored and a new feature comes out with a new revision of the software, I can go back and reprocess the image all over again. The original RAW image is never touched! That is a huge benefit when shooting RAW. You may also see my recent post: "Noise Reduction: Get Two More Stops". Regarding bit depth, it is always best to work with a higher Bit depth. You may have 12, 14 or 16 bits. You most likely will not see the difference between them. All pictures are printed at 8 bits. So once you have done all of your touch-ups white balance, exposure compensation, etc, reducing to JPEG is okay.
Kirk W. Masters is a Professional Wedding Photographer in Windsor Ontario In appreciation if you would be so kind as to give us a G+ and a Facebook Like KW Masters Photography on our Facebook page. You only have to do this once and add your likes and G+ per post. Thanks for dropping by.


No comments:
Post a Comment